
Sarasota Garage Floor Coating: A Real Before & After Transformation
Most homeowners who call us about a garage floor coating aren't calling because the floor looks bad in photos—they're calling because it's bad to live with. Oil won't wipe off anymore. Tires leave soft black smudges every August. Dust collects on the tires of the bikes and the bottom of storage totes no matter how many times the floor gets swept.
That's the situation we walked into on a recent project in the Palmer Ranch area of Sarasota, and it's a good example of what a professional garage floor coating actually involves—not the five-minute DIY version, the real one, with diamond grinding dust, crack repair, and two coats of heavy-duty polyaspartic.
Project at a Glance
A professional Sarasota garage floor coating transforms a cracked, stained, or dusting concrete slab into a durable, easy-to-clean surface using diamond grinding, crack repair, and a polyaspartic or epoxy/polyaspartic hybrid system with decorative flake.
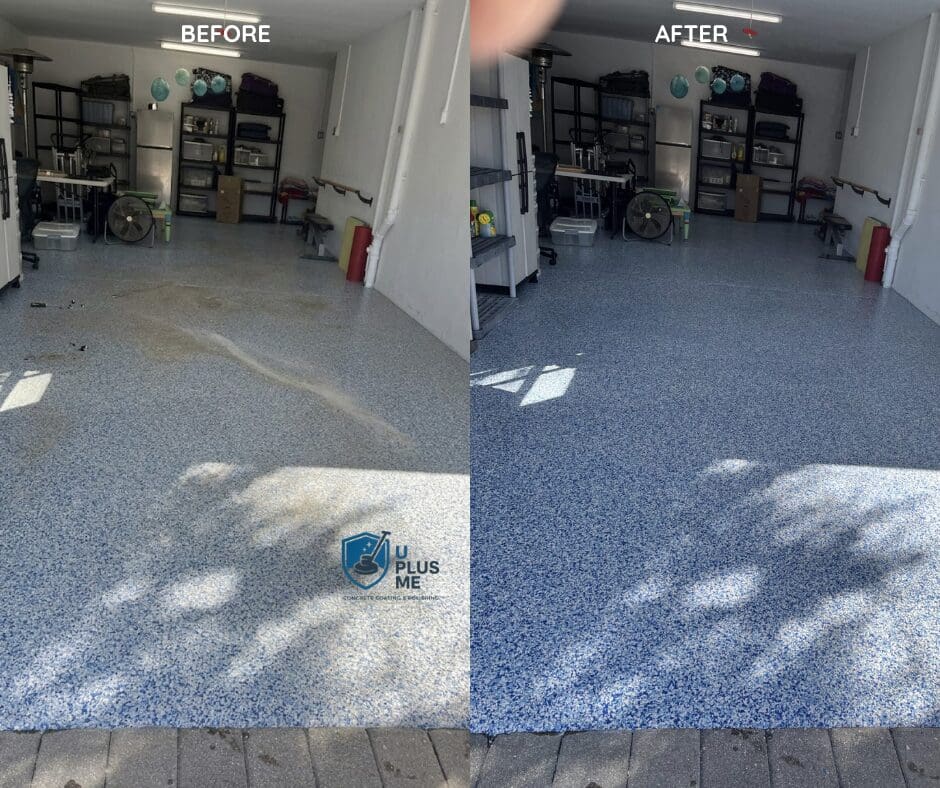
In this specific case study, a 20-year-old Palmer Ranch garage floor with oil staining, hot tire marks, and surface dusting was ground down to bare concrete, repaired, and coated in a two-day process. The result was a floor that resists hot tire pickup, hides minor imperfections with a decorative flake broadcast, and holds up to Florida humidity and UV exposure far better than the original bare or painted concrete.
Before the Project
The garage was original to the house built in the early 2000s, so the slab was over 20 years old. The homeowner had never coated it professionally. It had been painted once, years earlier, probably with a standard concrete porch-and-floor paint from a hardware store, and that paint was peeling in sheets near the garage door threshold where tires roll in and out daily.
What we saw on our first visit was pretty typical for a Sarasota garage that age:
- Dark oil staining under where both cars parked, soaked in deep enough that a hardware store degreaser only lightened it.
- Hot tire pickup marks—soft, sticky black patches where the old DIY paint had partially lifted from intense tire heat.
- Fine surface dusting, that chalky residue that comes off on your hands and the bottom of anything stored on the floor.
- Two hairline cracks running from the middle of the slab toward the garage door, neither one moving, but both catching dirt.
- UV fading and yellowing at the apron near the door where Florida sun hits hardest.
The homeowner's goals were straightforward: stop the staining, stop the dust, and end up with something that looked like a finished space instead of a worn workshop floor. They also wanted the coating done right this time, since a neighbor's bargain garage floor coating had started peeling within two years—a common complaint we hear that almost always traces back to skipped surface prep.
Initial Inspection & Problems Found
Before we quote or schedule anything, we inspect the slab. This isn't a formality—it changes what the job actually requires. On this slab, moisture readings came back within a normal range for the season, the cracks were verified as non-structural, and the old failing paint was identified as the main obstacle standing between us and a clean surface the new coating could actually bond to.
Florida slabs, especially older ones without a proper vapor barrier, can carry more moisture than they show. Learn why we analyze Moisture Vapor Transmission (MVT) before choosing a system chemistry.
The two hairline cracks on this slab were stable and not actively moving. This meant they could be routed, filled, and sealed under the coating rather than requiring a structural foundation repair.
Once the inspection was done, the final technical checklist looked like this: failing paint needing full removal, deep oil contamination in two zones requiring heavy degreasing passes, stable hairline cracks needing flexible polyurea repair, moderate surface dusting indicating a weak top layer of concrete, and UV discoloration at the apron. None of this was unusual for a Gulf Coast garage, but skipping any part of addressing these hidden problems is exactly why standard floors fail early.
Tired of Peeling Paint and Sticky Hot-Tire Spots?
If your Sarasota, Lakewood Ranch, or Palmer Ranch garage floor needs an honest, long-term fix, start with a professional inspection. We'll tell you exactly what your concrete slab needs—no upsells, no guesswork.
Why Preparation Matters
This is the part of the job that doesn't fully show up in a standard "after" photo, but it's the sole factor that determines whether your garage coating lasts five years or fifteen.
We ground the entire 450 sq ft slab using specialized diamond tooling. This removes old paint, opens up the concrete surface pores, and creates a proper mechanical profile. Coating over smooth concrete without grinding is the number one reason floor coatings peel.
Both hairline cracks were routed out and filled with a flexible polyurea crack filler rather than a rigid patch. Rigid fillers in a hairline crack tend to crack again early; flexible fillers move slightly with seasonal slab expansion.
The oil-contaminated zones received multiple heavy degreasing passes before and after diamond grinding. Oil that's soaked into concrete for years doesn't fully release with just one surface wash.
Grinding generates an immense amount of fine concrete dust. Any dust left behind acts as a bond-breaker. We clean the slab thoroughly with industrial HEPA-filtered vacuum equipment, never a standard shop broom.
How the Garage Floor Was Installed
Once the concrete slab was perfectly profiled, repaired, cleaned, and fully dry, Michael McIntire and the team began the multi-layer application process.
The Base Coat: We applied a high-solids base coat formulated to fuse with the freshly opened concrete pores and provide a wet bed to receive the decorative color flakes.
Decorative Flake Broadcast: While the base coat was still wet and workable, we broadcast decorative color flakes across the full surface to the point of "rejection" (meaning absolute full coverage so no bare base coat is visible). On a 20-year-old slab, this full broadcast is what hides minor surface variations and cosmetic pitting perfectly.
The Polyaspartic Topcoat: After scraping and vacuuming away all loose, unbonded flake material, we applied an industrial polyaspartic topcoat. Learn why we use polyaspartic over epoxy in Florida garage environments: it cures exceptionally fast in Gulf Coast humidity and resists hot tire pickup completely, preventing the sticky lifting common with softer epoxies during hot summer days.
Before vs After Comparison Table
A detailed look at the structural and cosmetic changes achieved during this restoration:
| Condition Factor | Before Installation | After Professional System |
|---|---|---|
| Surface Finish | Peeling paint, bare worn patches | Full-coverage decorative flake polyaspartic system |
| Oil Staining | Visible, degreaser-resistant automotive fluid stains | Removed at prep stage; fully sealed under coating |
| Hot Tire Pickup | Soft, sticky black tire marks in summer | Coating rated for high tire heat; zero lifting |
| Concrete Cracks | Two hairline cracks actively catching dirt | Routed, filled, and seamlessly hidden under flake |
| Surface Dusting | Chalky concrete residue transferring on contact | Fully sealed non-porous surface; zero dusting |
| Cleanability | Required heavy scrubbing and industrial cleaners | Wipes down smoothly or hoses clean in seconds |
| UV Resistance | Fading and yellowing at the apron edge | UV-stable aliphatic topcoat resists sun exposure |
Timeline and Project Pricing
Most straightforward two-car garages in the Sarasota area run on a predictable two-day install schedule, weather permitting.
| Project Stage | Estimated Time Frame |
|---|---|
| Inspection & Quote | Same-day to 1 on-site visit |
| Surface Grinding & Crack Repair | Day 1 (Full Day Prep Work) |
| Cleaning & Dust Removal | End of Day 1 |
| Base Coat & Flake Broadcast | Day 2 (Morning) |
| Polyaspartic Topcoat Application | Day 2 (Afternoon) |
| Foot Traffic Ready | ~24 hours after topcoat application |
| Vehicle Traffic Ready | ~72 hours after topcoat application |
| Full Chemical Cure | ~7 days total |
What the Homeowner Noticed After Installation
The two things the homeowner mentioned first, a few weeks in, were how much easier the floor was to sweep and how it no longer felt "sticky" near the garage door on hot afternoons—the old hot tire pickup issue from the box paint was entirely gone.
They also noted the garage genuinely looked like a finished part of the house now instead of a separate, older-looking utility room. It's less about any single feature of the coating and more about the stark engineering difference between a floor that's simply been patched and painted versus one that's been mechanically ground and installed by an expert crew.
Expert Contractor Insights
- The floor is only as good as the grind. If a contractor's quote doesn't explicitly mention diamond grinding or if they substitute an acid etch instead, ask why. Acid etching provides a significantly weaker profile and is a shortcut behind early coating delamination.
- Ask what topcoat is being used. "Epoxy" is often used as a lazy catch-all term, but a straight epoxy topcoat and an aliphatic polyaspartic topcoat behave completely differently under heavy sun. Learn why standard epoxy garage floors turn yellow in Florida and how polyaspartic stops UV damage completely.
- Flake systems aren't just cosmetic. On older slabs with surface variations, pitting, or old stains, the decorative flake broadcast does real structural work masking imperfections that grinding alone won't erase.
Common Mistakes Homeowners Make
The most common mistake is hiring a company based on the lowest price alone, resulting in a quote that skips heavy mechanical grinding entirely (sometimes labeled vaguely as "prep included"). The second is coating over a slab with an unmeasured moisture issue, which shows up later as bubbling or large blisters. A third is assuming any two-day garage floor job is the same regardless of who's doing it—the difference between a floor that lasts two years and one that lasts well over a decade always comes down to the meticulous preparation work nobody sees in the final photo.
Sarasota summers bring sustained high humidity, and homes in Siesta Key, Palmer Ranch, Fruitville, Southgate, The Meadows, or along University Parkway and Bee Ridge tend to see the same pattern: older concrete slabs, failing retail paint, and a system that must be matched carefully to local Gulf Coast conditions.
Frequently Asked Questions
How long does a garage floor coating last in Sarasota?
A properly prepped polyaspartic garage floor coating typically holds up well for over a decade, though the actual lifespan depends heavily on surface prep quality, product chemistry, and daily wear.
Is polyaspartic better than epoxy for a Florida garage?
Polyaspartic generally cures faster in humid conditions and holds up better against hot tire pickup and UV yellowing than standard epoxy, which is why many Gulf Coast installers use it as a protective topcoat.
Can old, deeply stained concrete actually be restored?
In most cases, yes. Mechanical diamond grinding removes the contaminated top surface layer where staining and old paint sit, and any remaining deep discoloration is completely covered by the decorative flake and base layers.
How long before I can drive on the new polyaspartic coating?
Light vehicle traffic is safe around 72 hours after the topcoat is applied, with a full cure taking about a week. Loading heavy toolboxes or floor jacks too early can scuff the material while it's still settling underneath.
Does Florida humidity affect the installation process?
Yes. Relative humidity affects chemical cure times and the narrow window in which a coating can be properly installed. Professional crews track ambient conditions and dew point closely before mixing resins.
Ready for an Honest Fix Built to Handle Florida Heat?
Peeling paint, sticky hot-tire spots, and deep oil stains won't get better on their own. Covering them with a cheap retail DIY kit usually just delays an expensive redo.
If your Sarasota, Lakewood Ranch, or Palmer Ranch garage floor needs a professional, commercial-grade upgrade, start with a free garage floor inspection from U Plus Me.